Saturday, May 22, 2010

Time to get some sun

More fussy details the past couple of weeks. Some fun fussy, and some not so much. On the not so much side, I've been to Hamilton Marine everyday the past week buying screws, rivets, bolts, nuts and washers, since every piece of hardware I have requires a different type of fastener.

On the more fun side, I made the shiv for the main halyard. Typical boatbuilding. . . make something nice, then put a big hole in it. The little bent over piece that will line the hole was tricky. One bend is easy, just clamp it in a vice and pull on it. But how do you get the 2nd bend? It's pretty easy to make it ugly, but you need a really good block and a big hammer (preferably metal) to make it look good.


Here are all the pieces put together. Ready for some running rigging!


The spreaders are also now installed on the mast.


A little detail shot. . . the pieces on top of the little brackets I made are called tangs. They hold the ends of the shrouds, wires which support the mast. There are actually 3 sets of shrouds on this mast, the usual uppers and lowers, but also another set which runs from the spreader to the top of the mast thru something called a jumper strut. I'll have pictures of that set up next time, as the jumper is still being fabricated.


Now to explain the title of this post, and maybe clarify this whole spreader/shroud thing to folks not familiar with sailboat rigging. As I just mentioned, the shrouds are wires that attach the mast to the boat. Sure, I have plans that tell me how long they should be, but just to be sure, why not measure? So we pulled the boat out of the shop and stepped the mast.


Well, maybe this doesn't explain much. . . tough to see in this picture, but if you look closely you can see lines. One running from the top of the mast to the back, one about 3/4 of the way up, thru the spreader, and down to the side of the boat, one from just below the spreader to the side of the boat (remember the chainplates? that's where they attach), and one about 3/4 of the way up to the front of the boat. I can now measure these and tell the sail guy what length of wire we'll need.

And that's it for the shop. The weather is forecast to be fine the next week, so I'm working outside for a little while. You can see the big white shed in the background. A big (40') boat is coming out of there this week, so we'll move inside the shed for final finish work. It will be nice to get away from all the dust in the shop for final painting and varnishing.

A new mold is already being set up in our spot for the next boat, a Buzzards Bay sloop. On the other side, the Haj is coming along quickly now, with the cabin top in place and the laid deck going on. Six people working on the boat all at once. . . must be nice.


One last shot.

Monday, May 10, 2010

Rudder

The last major piece to go on the boat is the rudder. Here it is in pieces.


The rod is attached to the oak with 1/4" bronze bolts countersunk into the oak and peened over flush with the rod. The little cut out at the bottom of the rod will accept a bronze strap which will be attached to the deadwood later on. Backing the rod in order to peen it over was quite a task, since there was no real good way to hold/clamp the rudder and back the rod at the same time. This is the best we could do. . .

2 of us held the rudder while the 3rd hammered away at the bronze until it was flush. Ready for installation. . .


Remember all that fussy drilling a few weeks back? Well this is where it pays off. Below is pictured the flange, containing a 1 1/2" pipe which slides all the way through the keel, into that hole we drilled. The pipe accepts the rudder, which is sticking out a few inches in this photo (the tiller will be attached at the top) and points the rod directly towards the bottom of the keel. By the way, I can't take credit for this beautiful bronze work. It was done by a local metal worker named Bill Lowe.

Sure enough. . . right where we want it. It helped that the aft piece of deadwood had not yet been installed so we could custom fit it not just to the boat and the lead, but also to the aft face where the rudder lies. The bronze strap near the bottom lies in a chiseled out section of the deadwood so everything is nice and smooth.

She's a boat now! Note the chain hoist had to be hooked up again in order to lift the boat up to install the rudder.


In other news, I made the spreaders, which are short pieces that stick out of the mast about 20' or so in the air. Their purpose will become clear later if you aren't familiar with the rigging of a sailboat.


I do get to take credit for the metalwork on these guys. This is a perfect example of why the apprenticeshop is such a great place to learn. It takes more skills than woodworking (although that is the big one) to build a boat, and at the shop, you get to try them all. I've never done any metalworking and frankly never thought I would. But after seeing how easy it is and how few tools you need to do a lot of things (shaping and drilling will take you a long way), I start imagining how to incorporate metal into everyday woodworking projects. Bronze is beautiful stuff.


Speaking of bronze, the collection is pretty much complete.

Finally, the twins are back in the water! She got a little upgrade this winter. The sternpost now has a ring which will act as a traveler, so we don't have to move the sheet back and forth every time we tack. Again, if you aren't familiar with sailing rigging, this will make more sense later once we get everything put together. Since the mermaid will be done in plenty of time for launch on June 18, I'll have some time to do rigging work on the twins.


Happy Spring!


Sunday, April 25, 2010

Lots of Little Boats. . . and Bronze!

As promised, we had a launching last week. All the new kids finished their Susan Skiffs, and the "seniors" completed the 2 fancy small boats started last fall. Unfortunately with 6 boats being launched there are a lot of people around, so I never got a good shot, but they looked great all sitting there on the beach.

All the builders (except Jamie, who graduated last december). From left to right, we have Doug, Josh (along with Jamie, my partner on the Twin project), Thor, Sarah, Andrew, Jeff, Matt, Hobbes, Phil (the intern. . . who built his boat alone as quickly as everyone else built theirs in pairs), Adam, and Drew.


Soon after that shot was taken. . . boats in the water. It's like a little armada out there.

The Whitehall. . .

And the A&R. . .
Back in the shop, I've been doing some shopping.

The collection of fittings has started. Besides these pieces (only about 1/3 of the fittings we'll buy), we've also had the the rudder post system fabricated (pics next time) and I've bought some bronze plate for fabricating some of the easier pieces. About $5,000 worth of bronze on this little boat (not counting the fasteners already in the boat). This is probably a good of time as any to talk about the economics of wooden boat building. I've kept a semi-close eye on expenses for this boat and here is my estimate of raw materials. . .

Bronze fittings $5,000
Sail (incl. rigging rod/track) $4,000
Wood $5,000
Mold/Jigs $800
Fastenings $3,000
Paint/Epoxy/Varnish $1000
Other $400

Total $19,200

Now add in depreciation costs for tools, the cost of heat, leasing a building, etc. . . and we haven't even gotten to labor costs yet. Sure, we are apprentices and it is taking us a year to do what the pros could do in a few months. But I'd imagine they would still like to get paid a little bit so they can eat and build another boat someday. Price on the mermaid today (from the apprenticeshop, where labor is free and fixed costs are subsidized by donations) is $30K. A steal at twice the price. My guess is a real boatyard would have to charge around $70K for this boat.

Back to the shop, and the business of making stuff. I've been varnishing the spars, so not much happening there. In the meantime, I've been working on the chainplates and their blocking. The chainplates are little bronze straps attached to the hull which you attach the shrouds to. The shrouds are the wires that run from the side of the boat to the top (or near top) of the mast, holding the mast in place. When going upwind, that's a lot of stress transferred to the hull, so things need to be solid.

Here is a quick shot of the actual chainplate. Just a piece of 1/4" bronze plate with a hole in the top, bent to the shape of the hull. No big deal. The real fun is the blocking.

Here is my first attempt. Seemed reasonable enough. I made a pattern of the shape of the hull, and cut out the block to that shape. It's subtle, but the back face of this piece is curved. . . think of the side cross section of the boat. Flat up top near the sheer, then curving down to meet the keel. Then I cut out the block so it will fit snug between the sheer clamp and the planking. Now it is just a matter of slipping this block under the clamp up and flush with the bottom of the clamp, bottom of the deck and inside of the planking. By the way, the slot in the deck in the upper left corner of this picture is where the bronze plate comes through.


See the problem yet? This block is impossible to install. It will fit, but to slide it under the clamp I have to start 4" below where it eventually will reside. The boat really starts to curve towards the keel there, so the block gets pinched between the clamp and the planking. If the frames weren't in the way we could go at this sideways, but, of course, they are. The correct answer is to install these things before the sheer clamp (i.e. 4 months ago). A bad solution is to shave off the top of the block until it fits, but then you don't have much of a backing block, do you?

Here is the actual solution. . . cut the block in half.

After a little bit of futzing and slotting out the back of the blocks to accept the plate. . . voila!

The bronze will bet clipped off at the bottom and the holes (just screw holes to hold the pieces together while I shaped them) will be filled and painted over, so these should look like solid blocks when all is said and done. The wedging action holds everything in place tightly, so installing the fasteners will be a breeze. One final shot which should give you an overall view of what is going on. . . keeping in mind the cockpit combing is causing a little illusion. The chainplates and their blocking are about 7 or 8 inches behind the combing, more or less parallel with it.


Next up. . . the rudder.

Saturday, April 10, 2010

Spars

Short entry this week. We were on spring break for a little bit, so I got to go home and put some holes in one of our walls. They look nice, but again I have the camera issues, so no pictures. Same issue with the boat. . . not a lot of pictures.

I did get the camera working for this post, however. The mast is all put together. Looks pretty simple, just a long box, but there is internal structure (forever hidden) and a cool glue up jig that has now been taken apart. Oh well. The result is nice.

I took this picture of the bottom of the mast to give you some idea how this thing is put together. The bottom is actually the most complicated part, with internal blocking on all 4 walls as well as a center piece. About 80% of the mast is completely hollow, and only the very top and bottom foot of the mast are completely solid. Ignore the screw, as that is just for hanging the mast while I varnish it.

The 2 side pieces (call them the walls of the box) have a 1/8" rabbet in them which give a good glue surface / alignment aid for the top and bottom pieces. Before I glued up the box, however, I glued pieces onto the inside of the walls at the bottom of the mast, about 15' up (to support the spreader), and about 23' up (to support the jumper). At the very top and bottom I put in a center piece to make the mast solid.

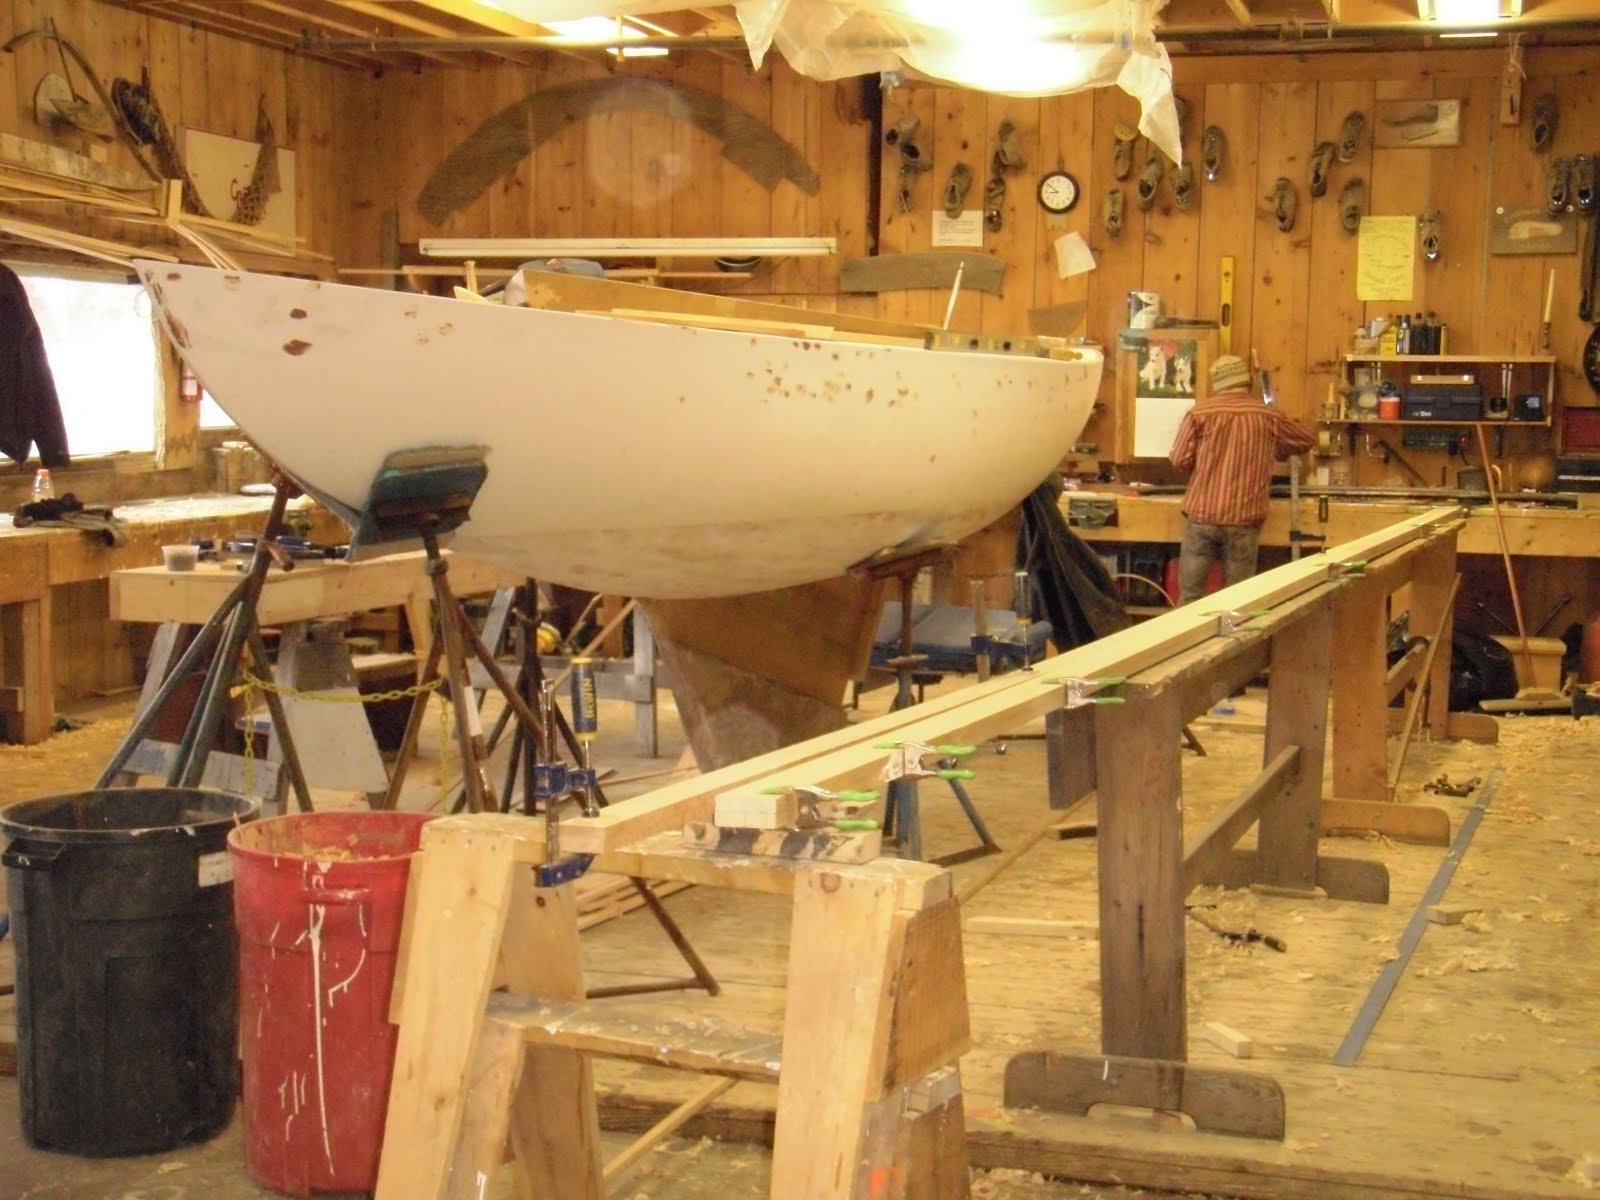
To glue up the mast I built a 30' long bench. I use the term bench loosely as it was only 2" above the floor. That was all we needed to get a clamp under it for the glue up. The bench also gave me a surface to draw out the shape of the mast (it is curved from bottom to top) so as we glued it up we knew we were gluing it up correctly.

Inside the boat, the seats and sole are coming along. There will be little storage shelves behind the seats, underneath the combing.

The Haj is starting to look really good. This is the view from our boat. Pretty nice work environment.

Next post. . . Launch day! No, not for me, but the small boats are getting thrown in the water.

Saturday, March 27, 2010

Slow Progress

The other title for this post could be "Lots of little jobs that don't add up to much"

I've switched gears into hardware / mast mode while Pat and Phil have been working on the interior, so the boat looks a lot like it did 2 weeks ago. The annual boat show in Portland was this weekend, so we cleaned up the boat and work area for a photo shoot. Still no takers, so the boat can still be yours! Buy now and you get to pick the color.

I went up to Sommes Sound on Mt. Desert Island to look at the original mermaids again. Spent a couple hours measuring the locations of fittings on the mast, cleat sizes, line sizes, and talking to an owner about how he set up the running rigging (sheets / halyards). Pretty exciting stuff, as now I know how the rest of the boat is going together. There is nothing left but to buckle down and finish her.

To that end, here is a preview of the cockpit layout, which in my humble opinion, will be nicer than the original mermaids, as the sole and the seats follow the curve of the combing.

One interesting problem is how to make the hole for the rudder post perfect. It is a 1 1/2" diameter hole which angles thru the keel in such a way to hit the back edge of the lead. There is about 3' between the bottom of the keel and the lead. Here is the solution.

I start by drilling a 1" hole as best I can, with help from my partners sighting the virtual line from the bottom of the keel to the lead. Then we put a 7/8" rod into the hole and line it up using the bearings you see in the pictures clamped/screwed to the boat. The trick is the rod has a place to hold little cutters which you can stick out anywhere between 0 and 1/2 inch. Once everything is lined up, I can slowly push out the cutters, do a little drilling, and make the hole larger, so even if the original 1" hole was off center, or at an incorrect angle, by the time I've expanded it to 1 1/2" it is perfect.

I'm now waiting for a bronze fitting to continue with the rudder work, so I've switched gears to the spars. The spars are pretty simple on this boat. They are not round, which was a little bit of a disappointment to me, as I have yet to make something round, but I still have the tiller and the spinnaker pole. The boom is a simple T shape.

The mast is a hollow box, which tapers from the bottom to the top. I spent a few days laying / cutting these side pieces out, much like I would cut out a plank from a long piece of cedar. These are sitka spruce, by the way. The side pieces are only 11/16" at the top, and I had some bad grain run out, so as I was planing down to the final thickness, one of them snapped off. Bummer. Oh well, better to find out now than at the launch. I chopped off the one that made it thru but still looked sketchy and scarphed on new pieces.

Not too exciting yet, but I now have all the pieces, so this should get glued up next week.

I also awoke the inner engineer and made a spreadsheet of all the fittings we are going to need. In total, there are about 100 individual pieces. A couple will require the services of a welder, 2 will be custom castings, several will be homemade, and the rest will require a lot of cold hard cash. Almost everything will be bronze. There is a salty old collector (and I mean that in the kindest of ways) nearby who has almost everything we need. He collects old hardware, cleans it up and resells it. His property is something straight out of a Wooden Boat feature. . . a small cedar shaked house on the ocean, a large workshop with hardly any space to walk thanks to years of not throwing anything away that could be useful, and a 40' trawler in the "temporary" attached shed which has been in the works for 10 years and launches this summer.

In other shop news, the Haj is all buttoned up and they have begun fairing. They replaced the rudder post, which (knock on wood) should be the last backwards movement on this big renovation project.

Sunday, March 14, 2010

The boat just got a lot bigger

I thought a lot about how to get this ungainly piece of lead and wood aligned properly underneath the boat. Having a couple of bolts in the keel at the start, just barely sticking out of the top seemed like the best way to align the thing with the holes in the bottom of the boat. At first, I thought we'd roll the keel under the boat, align it, and jack it up until we could tighten the bolts. The last step is easy, but how do you roll and align the keel without tipping it over at some point and crushing the volunteer who is helping you out?

The solution was to leave the keel in place, and align the boat to the keel. We've got video of this process, but I haven't been able to upload and edit it. Hopefully I'll have it for the next post. But this picture should give you the basic idea. . .

We used a chain hoist to position the boat above the keel. Side to side alignment was easy since the chain hoist could be moved along its support beam left and right (relative to the boat). We were about 8" off front to back though. No problem. . . just put the boat on the popits, move the straps to change the center of balance and then lift the boat again. The boat moves forward or back to balance depending on how you move the straps. We did this twice and got within 1/2". At that point, we just asked a bunch of folks to push the boat into position while we slowly lowered it onto the bolts.

Things are moving swiftly now since last time was a bunch of prep work. The dynel for the deck went on pretty easily. The only part which took a little patience was the wrap around the deck.

The one thing I forgot about when we started this process at 4 in the afternoon is that you want to trim the excess cloth off about 4-5 hours later when the epoxy starts to set, but is still "green." Otherwise you have to grind it off the next day when it is hard as plastic. So we had to head back to the shop around 10 at night to clean everything up.

To finish off the edge of the deck we fill in the the rabbet (along the side of the boat) with thickened epoxy (the rabbet is 1/8" deep and the dynel does not fill it in), sand it fair and then round it over.

Remember the cockpit combing? Time to get that in position. Clamping it to the carlin and screwing it into the cockpit area is easy enough. But what about the big curved and twisted area up front? Sure we steamed it, but that was a couple weeks ago, and 3/4" white oak likes to be, well, straight. After trying to wrestle these pieces together with big bar clamps that stretched into the cockpit as well as over to the sides of the boat, we finally gave up and spent some time to set up a proper clamping jig, braced off the ceiling.

The last step was to drill 3" screws up through the deck into the combing. That went o.k.

A little paint, and now she looks like a real boat!

This shot gives a little hint at the next step. Look behind the keel and you'll see a little sighting set up we used to drill the hole for the rudder rod. This is a 1 1/2" hole that has to be angled perfectly to hit the back of the keel along the centerline of the boat.

Before I sign off, just a couple updates on the rest of the shop.

Susan Skiff land is cranking. . . all the boats have their planking (sides and bottom) completed.

The A&R tender and Whitehall are almost done as well.